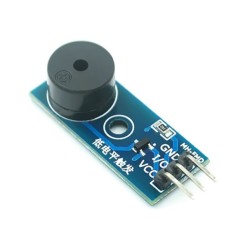
Active buzzer Module
Te quedan 120€ para el envío gratis

24h Delivery

FREE for orders over 120€

Secure payment
Usually joint purchase

Información del producto
The active buzzer module is an electroacoustic transducer capable of generating a constant tone without requiring PWM from the microcontroller. It only needs power and a HIGH digital signal to start buzzing.
Since this is an active buzzer, it generates a fixed-frequency tone as soon as the signal pin receives a HIGH level.
Simple Arduino example:
digitalWrite(pin_buzzer, HIGH); // buzzer ON
digitalWrite(pin_buzzer, LOW);  // buzzer OFF
Does this buzzer generate its own sound?
Yes. It only needs power and a HIGH digital signal.
Is it different from a passive buzzer?
Yes. The active buzzer has a built-in oscillator and produces a fixed tone. The passive buzzer needs a PWM signal to generate tones or melodies.
Is it compatible with Arduino?
✔️ Fully compatible and extremely easy to use.
Does it work with Raspberry Pi and ESP32?
✔️ Yes. Works at 3.3 V, though sound volume may be slightly lower.
Can I use it for alarms?
✔️ Yes. Perfect for alarms, alerts, warning tones and project indicators.
The ideal active buzzer for alarms, quick alerts and educational electronics projects.
You might also like